Raised Foil Prints for Christmas


Hello Lovely blog readers.  I hope you're all getting in to the Christmas Spirit.
I am very organised this year, which is extremely unusual for me, I am loving the feeling.


Dimples created some Raised Foil Prints for Christmas gifts this week.  Here they are:


Since most of the Christmas shopping has been done, wrapped and is ready under the tree (I know! Fancy that!)  these are some extra bonuses that are a gorgeous, very special label for some special peoples gifts.  They make the gifts look unique and wrapped with love or would like great as a DIY Card.

They're really simple to make. We havent used foil as a material before and it was so easy to work with.  The Raised foil Prints are made from cardboard base, with tacky dried glue pictures. I used a tacky clear craft glue to drizzle on the pictures and sat them up to dry.


Once the glue prints were dry I covered them with a small, thin layer of glue (not enough to dry bumpy) and covered them with Foil. Using a paper towel on top, I pressed down and rubbed the print so that the foil stuck down around the raised glue prints. It worked well.


Dimples had fun painting them. He did some red and green to match our Christmas theme and then sprinkled glitter over them. With the paint over them, the raised glue print isn't as noticeable, so as they dried I used the paper towel again to softly rub over the raised foil only, taking some of the excess paint off so the silver can shine through.  Then I stuck the final creation on some coloured paper, punched a hole, decorated with ribbon and tinsle and Dimples picked which gifts to add them to. We wrote a special message on the back of them.


I love the way they turned out.  They are beautiful and such a thoughtful gift topper. They were also a new and fun way for us to be creative with our Christmas Decorating and wrapping.

Happy Christmas Adventures

Easy Christmas Sponge Stamping


This is a fun Christmas themed Painting activity and if you have some large paper you could re-use the child's beautiful Christmas Art as home made Christmas wrapping paper.
There are many benefits of making art from a young age but the most important thing is the process of creating.  These Easy christmas Stamps are reusable and provide lots of fun!


All you need are some washing up sponges, I didn't have a pack handy but I did have these scourers with sponges on them so they did the trick. Cut them into Christmas Decorations and provide some trays of paint to dip into. Then you can create and learn while having fun, discuss Christmas and what it means to your family or to the child and get them into the spirit ready for the happy holiday Season.


We did a Candy Cane, Christmas Tree, A present, A star and a circle as a Bauble.
Then we Dimples finished he rinsed them out, splashed them around in a bucket of soapy water and squeezed them clean, all ready to be re-used another day.
Cleaning them is part of the messy fun as well so dont forget to assign the little ones to that task as well.

 
Dimples enjoyed squishing the sponges into the paint and did some good disposition matching once he got into it, he used the star to go on top of the tree and the presents to go underneath.
I love doing this kind of fun with him because there is no right or wrong way to create. It is very personal and self soothing so it fosters independence and confidence; It is all about the process and how he wants to create. It's all beautiful in my eyes and its the fun making it that is most important.


Creating Art and Painting is a fun and easy young childhood activity, it allows the child freedom to create and use their imagination, it is a wonderful tactile experience, it strengthens their little hands and fingers, and did you know it enhances neural connections in the right hemisphere of the brain which is responsible for emotional regulation, intuition and creativity.
So grab some paint and have some stamping fun.


Happy Adventures :)

Felt Recreatable Christmas Tree


If you look on Pinterest or follow any other children's blogs you may have already seen a similar Tree to this; A Felt Children's Christmas Tree.
I made our Felt Re-createable Christmas Tree last year but never did a blog post on it as there were so many others at the same time so here we are now, setting it up for the second year.
 
The basic idea of the Felt tree is that it is a very special Christmas tree, made especially for the child to recreate. They are always distracted and drawn to the shining sparkling Christmas tree decorations but once your tree is up, you would like it to stay that way.
With out little monkeys swinging off it trying to grab up at the decorations, rearrange the tinsel, possibly even trying to climb to the star at the top!
Sound Familiar?

That's where the Felt tree comes in handy. This is their very own Christmas Tree that they are allowed to grab at and re-decorate over and over again keeping their fingers busy and away from the real thing. 

All you need is Felt. A Large Piece of Green (well it doesn't have to be green, you might like a White snow Tree), cut into the shape of a tree. Then smaller felt pieces in different colours for your decorations. Pin your tree up to a wall or large board and get your decorations cut out ready to play with. Then your little one can recreate their tree every day.

 
Its like a large felt board, just cut your circular balls, some stars, stocking shapes and so on as your decorations. You can be as plain or as crafty as you like.
You can use Christmas Cookie cutters as inspiration, simply trace your shape and cut it out.
I used a hot glue gun to combine colours on some of the decorations and to make some presents.
Now the felt tree can be created with any themed colours in any way every single day if they like, one day might be all stars, or all red decorations, one day it may remain blank or with no presents.
Dimples has a small gift bag that his decorations stay in at the bottom of his tree until he wants to decorate it.
 
Happy Adventures  :)

Extreme Outdoor Free Painting

 
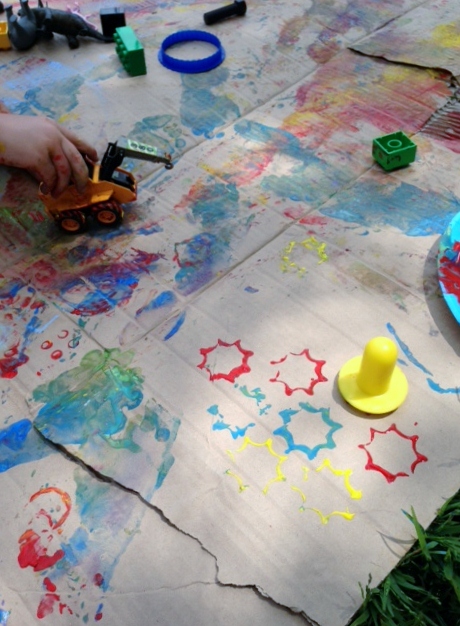
This was an Outdoor open ended free-Paint activity that was stacks of FUN.
All You need is cardboard, a large flattened box or left over packing cardboard is big enough, Paint and a bucket of miscellaneous objects that can make prints with.
Dimples gathered some bits and pieces including cars, trucks, plastic animals with good feet for foot prints, some plastic tool pieces (bolts and spanners), Some duplo Lego blocks, plastic play dough/cookie cutters and a rolling pin. 
Experimenting with shapes:  Anything will do really, as long as it can get covered in paint & then soaked in water after the fun.
Prepare for mess!
It was a lovely day so Dimples got down to an old singlet and underwear, I put the cardboard out in the open on the grass with some plates full of different coloured paints knowing well and good that it would get messy and let him go.
If you are prepared for an easy clean up, then an easy clean up you will get.
He was very enthusiastic about his Art work, using his entire body to make the Art Piece.
Give complete control with a smile on your face.
He Started with the rolling pin, running it across the cardboard and experimented with the different items he had collected. Lego, tire tracks and a teenage mutant ninja turtle were the favourites until he realised HE was covered in paint and Mummy was smiling about it.
Then he decided it was time for some body painting.
As usual Hand prints and foot prints to to begin with. Dimples tried on different colours and I asked him to do different types of movements like the animals he has collected.
Experimenting with mixing colours, printing, stamping, body painting and large Gross Movements as he painted was the most fun with Paint that Dimples has had in a long while.

Stomp like a dinosaur, tip-toe fast like a lizard, crawl sideways like a crab, Hop like a Kangaroo, Slither like a snake.
It was physical fun painting as he got right into it jumping, prancing and dancing his way around every corner of his canvas which is what made his Art work even more beautiful in my eyes.
The Best painting is Extreme painting with No limits and with No Brushes.
I gave Dimples complete control of the paint and he found that he could squirt the glitter glue right across the cardboard like an "explosion"he told me. He enjoyed smearing it in and trying to splat more out over his toes.
Once he discovered the body Painting he didn't go back to the Lego prints or cookie cutter shapes.
He rolled around, crawled around, spun around, danced and hopped all over the cardboard then laid in it painting up his legs telling me that he too was changing colour.
With No restrictions he really expressed himself and enjoyed himself.

 
The cardboard became a rainbow of prints and shapes, smears and splat marks. Dimples did as well, almost camouflaging into the work of Art.
After all the mess, it was too easy to just put his still wet with paint clothes in the washing machine for a rinse and him in the bath (which turned a lovely crimson shade).
For the hour or so of fun he had and the delightful expressions on his face as he enjoyed himself I can handle a bit of paint mess, even if it meant getting splatted a bit myself.

Do you think your child would have this much fun rolling around in paint?
How do you take ART & CRAFT outdoors?

I'd love to have you share your answer to that question and any ideas you have with me on my face book page.
 Follow Adventures at home with Mum on Facebook

Happy Adventures  :)

Our Snowman Christmas fridge


This super easy DIY Christmas decoration is a must to get little ones in the spirit. It was so easy that dimples did the decorating himself. He was very pleased with his snow man and asked me to send a photo to his favourite aunt.

All you need are some circles cut from paper or cards stock. Eyes and buttons. Some wrapping paper cut long enough to fit across your fridge as his scarf, with some longer down pieces. Bluetac or tape, an orange triangle nose and dot stickers for the mouth.
I had everything in the craft box but you could make do with what ever you have available; pom poms, real buttons, a plane colour scarf.


Dimples was in charge of the blue tac and helped Colour in the Snow mans eyes. He also chose the scarf wrapping paper and the coloured buttons.
He loved the snow man so much it got a big Hug.
It ties our fridge into the Christmas Decorations nicely.

Happy Adventures  :)

LinkWithin

Related Posts Plugin for WordPress, Blogger...