Showing posts with label Halloween activity. Show all posts

Halloween Sensory Tubs

Sensory tubs are the perfect activity for Halloween!
Lots of cool textures, gross feeling slimy things and bright colours. 
This is a Halloween Themed One we had at our Halloween Party.


The Basics:
A sensory tub includes objects that encourage children to explore using their senses.  It is an easy way to teach children about how they experience the world and to enhance their visual, tactile, and Auditory awareness.
Sensory tubs encourage exploration, experimentation and messy play. You can include things that have different textures; smooth, rough, slimy, crunchy, slippery, cold/warm, lumpy with everyday things such as rice, unpoped corn, cooked spaghetti, dry split lentils, beans, shaving cream, water beads, jelly or gelatine.
Here are some great ones that were linked up to our recent BOO! Halloween Link Party
1. Halloween Sensory Bin by blogmemom
2. Halloween Sensory box by Dirt & Boogers
3. Witches Brew Pretend cooking by me, Adventures at home with Mum
4. and here is a great general one for kids of all ages including younger kids who still mouth objects rice-bubble-sensory-tub by Paint on the Ceiling


All you need to do is add some materials that are tactile, they might feel different, have different textures or temperatures, they could have different smells, and put some objects in the bin that children can sift through and find, or bury with some tools to explore with; measuring cups, tongs, spoons, small spades, play safe microscope or just encourage the use of their fingers.
Not only is this type of messy play great in enhances the sensory learning for little ones but it gives a good opportunity for vocalisation, turn taking and of course imagination.


The Brain Box:
I made a Gross looking Spaghetti Brain. It was successful as well! On first attempt I made a cooked pasta brain and attempted to set it in glue in the hope to use it as a table decoration but that was a big fat FAIL of an idea. I came up with another great idea, this one was more practical.
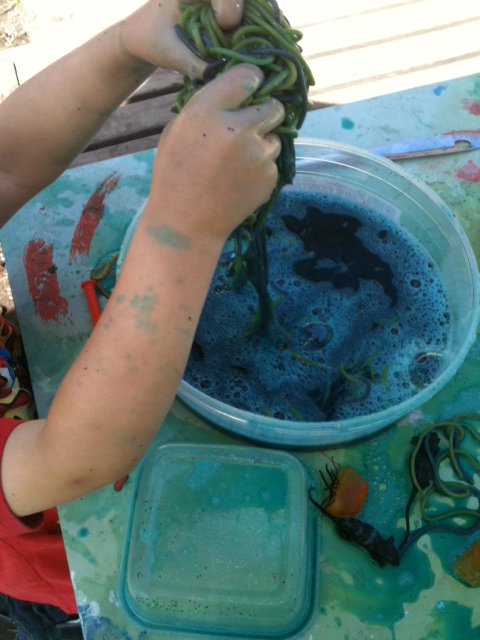
I cooked some spaghetti, soaked it in green and yellow food dye (the yellow adds a bit of brightness to the green). Once the colour had stuck, I drained the spaghetti and then placed it in a bowl. But first I put a circular piece of baking paper in the bottom of my bowl so that the brain would slide out easily. Don't forget this crucial part otherwise you could be digging your brain out before the kids get to see it.
 

I mixed up some Red Gelatin. You could use jelly but Gelatine in much more rubbery, it sets firmer and withstands room temperature for longer than jelly. In play, I use gelatine over jelly for that reason, it lasts longer and is more pliable with a smooth rubbery feel.
After I packed and pressed the Spaghetti into the bowl I mixed up the gelatine and poured it in, I would have used a litre but you should use enough so that you can see it at the top of your spaghetti (so that all the spaghetti will be set in the gelatin and held together).  I set it in the fridge for a few days until the party.
And this was the result;


It worked pretty well, i used a butter knife just to separate the gelatine off the walls of the bowl and with a firm hand wiggled the brain around in the bowl until I felt it had all separated in one piece. Tipped it out upside down in the sensory tub and Voila. Brains to play with.
In this tub I surrounded it with water beads and plastic eye balls.
If your child Loves water beads like we do, check out my previous posts using Water beads...

The kids enjoyed it, poking at it initially. It wasn't long before there were some plastic rats hanging out of the brain and then there was some imaginary cooking and some digging.
This was the wet box, the water beads remain slippery and cold while the brain was slimy and smooth and warmed as it got broken apart. The water beads could be crushed and squished or bounced around or collected in a bucket. This was the hands on messy tub.

The Pumpkin Seed Box:


This one contained Orange Split lentils, dyed Purple Rice and Yellow unpopped corn. This sensory box was the dry one with lots of different textures. There were some measuring cups and some small pumpkin head buckets so that the children could scatter the 'pumpkin seeds', using hand eye coordination, tracking skills, visual attention and encouraging motor skills through scooping, pouring, measuring, burying, sifting and rattling the seeds around.

There were small Halloween plastic party favours in it as well that could be found under the grains or buried. For visual stimulation I kept the materials pale orange, yellow and light purple so that the bright green, Orange and black creepy crawlies and Halloween things stood out.


The Verdict:
By the end of the afternoon the 2 Sensory bins got mixed around, and there were some great pretend cooking games using the Halloween buckets. One of the 5 year old boys who attended the party mixed up a good brew with some brains, some water beads, bugs, rats, bats, eye balls, creepy crawlies and pumpkin seeds. A bit of everything! 
Dimples pretended to taste the devilish dinner saying "yum yum" and licking his lips.
Messy play is definitly always a hit with young children. The kids ranged in age from 1 to 9 yrs old, and each one inspected  and messed around in the tables at least once, but it was the 3 yr olds who stuck with it and enjoyed it the most :)

The Sensory trays at the end of the evening. All messed up :)
Happy Adventures


Boo! A Halloween Linky

Witches Brew - Pretend Halloween Cooking

How to Make Witches Brew - Messy Pretend Halloween Cooking.


Witches Brew Ingredients:
  • Intestines (Spaghetti dyed with Orange, black, purple or bright green colouring)
  • Poisonous spiders (Orange coloured Ice cubes with Plastic Spiders)
  • Trolls Eye Balls
  • Magical Halloween Sprinkles
  • Bright Green Glitter Dust
  • Black Rats
  • Table spoon of cooking oil
Dimples spent the morning enjoying the sunshine and mixing up some gruesome witches brew.
He loves pretend cooking so this Halloween Themed Sensory play went well. He particularly loved the bright coloured intestines. He sang his own little song about mixing a spooky witches brew, adding the rats and did a little evil Cackle.


Benefits of this type of Messy Play:
  • Encourages children to manipulate materials, explore and experiment which in turn equals rich learning experiments.
  • Is process driven, not product, so it is the rawest form of sensimotor processing and exploratory learning.
  • Helps develop and fine tune Communication, literacy and verbal skills through discussion and "play talk"
  • Gross Motor skills such as stirring, mixing, pouring, shaking.
  • Everyday life skills such as sharing, turn taking, conversation, cooking skills and using cooking tools.
  • Sensory Play builds and strengthens important neural pathways in the brain
  • Mathematics through measurement, size, sorting, dividing, counting.
  • Scientific concepts such as mass, density, texture, temperature, and processing how materials are work
  • & of course Creativity.


After adding some water and a squirt of hand wash Dimples watched the colours run into the water and the orange ice. Out of curiousity he decided to smell it.

Dinner is served!
Every time we do pretend cooking Dimples tells me he has cooked me dinner and insisted i 'taste' it.
Below is the restaurant class Witches Brew that he cooked up for me


Ice & Salt Reactions - Halloween Theme

Spiders in Ice castles and a Salt Melting Experiment
 
Another Halloween themed play treat. This time Dimples had a play date with his good friend Miss K. I had prepared some Ice castles (using sand castle molds) with some spooky plastic spiders and flies frozen inside.  I set out the Ice castles, some salt to help melt the formations and some coloured water with a dropper each.


Dimples and Miss K went to work sprinkling salt over their Ice and trying to master the squirt droppers.  Its not working, they both exclaimed slowly adding more and more salt, but it was. The salt reacts with the ice and as the ice melts it speeds up the process, so as the salty water runs down the castle is causes cavities, rifts and small trails for the coloured water to flow through. 

 
It is a slow process but it looks really cool when the colours start running down the crevices. I think these two 3.5 year olds were just a little impatient and wanted to get to the spiders straight away. They stuck with it, adding different colours on top and watching it flow down the sides. Dimples the extremist tried to speed things up by dumping handfuls of salt on top.

 
It looked vibrant and some what spooky but it wasnt what he had in mind, so he tipped amore and more colour over the top.  Slowly he seen it start to melt down the sides and he seen some spider legs poke through.  Miss K successfully removed a fly and decided to taste the ice. Hmmmm yukky she said to the salt covered ice.

 
The two friends mastered how to use the droppers and the syringe squirts by observing me and each other, Miss K found it easier to do it one handed pushing with her thumb and Dimples mastered the skill using two hands to fill the entire tube then squirting it with his pointer finger. Both got the hang of it though. This intruquit technique helps develop the muscles in the hand needed for writting skills and develops hand/eye co-ordination.

They also got a lesson on colour mixing; as our yellow and red colours mixed together we got a nice bright Halloween Orange, and the yellow and blue = Green. The friends noticed that all of the colours pooled at the bottom of the tray into a black colour.

 
Happy Adventures :-)

Halloween Discovery Bottle

This is an easy fun DIY activity in preparation of Halloween. To get in the spirit we put this discovery bottle together in just 10 minutes and Dimples enjoyed exploring it all afternoon.


Using an empty Pom juice bottle we added-
  • Glucose syrup
  • Halloween Sequins
  • Eye Ball buttons
  • Orange Glitter
  • Black and red buttons
  • Small plastic spiders
  • Star sequins


We played I SPY, and named things starting by letter such as Spider, Star, Bat, button, Pumpkin, Eye, Orange, Black, White, Red, Slime & Glitter.  Dimples enjoyed helping make this one because of its funky shape and the messy time we had getting the glucose syrup in. These are so easy and simple, the best thing is though, anyone can make them out of recycleable materials and things you find laying around in your art/craft supplies, or even every day materials. Just remember to glue the lid shut!


6 months - 18 months:
Discovery bottles are great for developing observation skills, predictability and thinking skills.  For young children they are great for gross motor, grasping, passing from hand to hand, twisting, turning, shaking, they aide in the development of focused concentration. High contrast colours should be used for younger children to develop their sight perception, depth and visual focus. They are great for sight and sound sensory development and when used with more than one child can help in sharing, interacting and swapping.
 
18 Months- 4 years:
With older children they can be more detailed and used as  I Spy bottles to introduce letters, numbers,  themes and some science lessons such as separation, depth, gravity, density, sinking and floating. Again it helps with predictability, cause and effect cognition's, observation skills, focused attention and thinking skills.


They can be used for experiments such as sink or float, separation using water and oil, gravity with non liquid ones or like you seen here the Halloween one explore concepts of density and depth. Themes can be taught also, like the use of this Halloween theme. With non contrast similar colours and softer colours older children need to pay attention to objects presence.
If you want to make it more interesting for younger children, enrol their skills and help. Get them to choose what they want to add in to the bottle, how many and get them to help measure and pour anything in via a large funnel as I did with Dimples. This one is his favourite because he made it.


Happy Adventures :)

Halloween pumpkin play dough


It may be a little early but I've always been a fan of Halloween and get right in to the spirit of the decoration, dress up and trick or treating. Last year we had a Halloween theme play date and I'll do the same this year for dimples and his friends but for now it's all about psyching him up and building the excitement up with some Halloween craft and play.


First up, some orange play dough, some twigs with leaves on them and a black texter. Easy right. We had fun making these cute jack o lantern heads out of our play dough and they looked so cute.


Starting with some rolling dimples made balls, circular motions on the table and in his hands. Perfect!
Then using a stick he imprinted the sections through the pumpkins.


I made one first as he played and he imitated me straight away making the cutest pumpkin by him self.
Dimples was very pleased as he added in the pumpkin stems, asking me how they grow which started a great discussion. We then talked about the spooky jack I lantern face as I drew one on, then it was his turn.
They turned out so cool that we had to roll it all together and make one huge pumpkin head!


LinkWithin

Related Posts Plugin for WordPress, Blogger...